Pubic Apophysitis: A cause of Groin Pain in young athletes
What is Pubic Apophysitis?
A growth related pathology that can cause groin pain in persons aged 16-21 years old. This injury is a result of increased muscle tension to the area surrounding the growth plate, known as an apophysis. Symptoms can develop at the apophysis when it is irritated. Irritation is caused by increased load to the area while the apophysis is open. The apophysis is believed to stay open until the age of 21 but this can vary depending on age, gender, race etc.

Location of pubic apophysitis groin pain (Source: http://sportsmedicineimaging.com)
Signs and Symptoms
- Pubic bone pain with or without lower abdominal and/ or upper abdominal discomfort
- Gradual onset and worsens with progressive loading
- Symptoms are better after warm up but deteriorate after rest and worsen towards the end of physical activity
- Reduced acceleration, agility and kicking distance
- Sore at night and stiff following morning
Risk Factors
- Younger persons who are late maturers
- Increased load:
- Ball – change in size or weight
- Surface – Wet and uneven surfaces
- Frequency of training with lack of rest between sessions
- Type of training e.g. running
- Males aged 16-21 years are most at risk of developing this condition
- Type of sport – sports requiring running and rapid change of direction, e.g. AFL, puts you at greater risk
Treatment and Prevention
It is important to see your physiotherapist to address this pathology early rather than later as this condition can become quite painful if it is ignored. Current strategies to address this issue include:
- Load management strategies
- Training modification e.g. avoid training in wet weather
- Optimal recovery/ cross training
- Developing correct running biomechanics
- Address shock absorption capacity
- Multi-intervention neuromuscular training
- Optimise hip rotation
- Monitor groin strength
Prognosis
This can vary from 6 weeks to 12 months and is dependent on a number of factors such as level and type of sport, previous history of groin pain, coexisting groin pathologies.
Treating Cervicogenic Headaches with Physiotherapy
What are headaches?
“Headaches are often caused by disorders of the neck or physical and emotional tension. Physiotherapists can successfully treat headaches originating from the neck or soft tissues and show you how to prevent the pain recurring.” (APA Website)
Headaches can generally be classified into three different types:
- Tension headaches
- Migraines
- Cervicogenic headaches
Tension headaches are the most common and account for around 80-90% of all headaches. Migraines are less common but are usually more severe in nature and can cause nausea, dizziness, and sensitivity to light and/or noise. Cervicogenic headaches have been estimated to affect around 14-18% of the population and are characterized by chronic hemi-cranial (one-sided) pain referred to the head from the cervical spine or the soft tissues within the neck. This latter type of headache responds very well to physiotherapy and other forms of manual therapy targeted at the neck and surrounding structures.
Common symptoms of cervicogenic headaches:
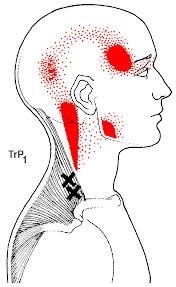
- Pain localised to the neck, back of head or temporal region
- Pain elicited by certain neck movements or sustained postures
- Neck muscular trigger points and tenderness to touch
- Increase in muscle tightness
Headaches can be extremely debilitating and can have a profound impact on people’s lives. Headache sufferers will often reduce their social activities and tend to lack concentration so may have a reduced work capacity. Productivity in the work place is certainly reduced as a result of headaches, which highlights the importance of early physiotherapy intervention to get symptoms under control.
What can Physiotherapy do to help?
Good quality evidence has shown that physiotherapy is very effective in relieving cervicogenic headaches. Treatment may include but is not limited to:

- Cervical joint mobilisations
- Soft tissue massage
- Neck musculature strengthening
- Dry needling or accupunture
- Postural correction
- Advice in regards to aggravating factors
If you suffer from headaches you should book an appointment with one of our highly qualified physiotherapists who can assess you and perform the appropriate treatment to get your headaches under control.
Real Time Ultrasound Physiotherapy
What is Real Time Ultrasound Physiotherapy?
Real time ultrasound physiotherapy utilises an ultrasound machine to assist with the assessment and treatment of certain conditions. It provides real time imaging by transmitting sound waves through the body. These sound waves are then reflected by tissues in the body to create images on the screen for us to interpret.
The benefit of real time ultrasound physiotherapy is that it allows you to see how your muscles contract whilst performing certain exercises.
What Can Real Time Ultrasound Physiotherapy Be Used For?
Core Strengthening and Retraining
Often the cause of lower back pain can be related to poor core strength and stability. Whilst core strengthening exercises will help improve symptoms it can be hard to feel whether these deeply embedded muscles are switching on and therefore whether the exercises are being performed correctly. For this reason the core muscles are often assessed via real time ultrasound to give patients the opportunity to actually see these muscles working. These core muscles include the;
- transverse abdominis
- multifidus
- pelvic floor
- diaphragm
Together, these muscles act like a corset to provide spinal stability. Activating these muscles can be difficult as the movement is very small. Using real time ultrasound gives you instant feedback on how your muscles move and can be an extremely useful tool for retraining correct motor patterns.
The transverse abdominis is the deepest abdominal muscle and is initiated prior to movement. Many patients have difficulty activating this muscle correctly as pain can inhibit muscle activity. This can also occur to the multifidus.
The multifidus is a deep muscle in the back, also important for stability, especially with movements requiring spinal extension. Research shows that patients with back pain have delayed transverse abdominis and multifidus activation. Due to their role in spinal stability, it is no wonder why physiotherapists prescribe core exercises to the majority of patients suffering from back pain.
Another muscle that can assessed with real time ultrasound physiotherapy is the pelvic floor. This is often important for patients who suffer from incontinence and is generally assessed by a physiotherapist specialising in Womens’ Health (for more information visit Women in Focus Physiotherapy).
The diaphragm is not assessed on real time ultrasound but its role for spinal stability is not ignored. This is why patients are encouraged to maintain a normal breathing when performing the exercises prescribed. When patients have difficulty with an exercise they tend to hold their breath. This is a bracing strategy patients use to support themselves and can be retrained with correct cue’s and exercises to allow correct function of the diaphragm in stabilising the core.
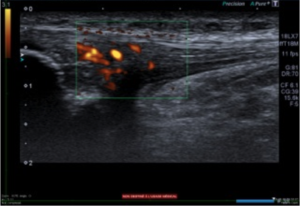
Tendinopathy Assessment
In addition to assessing the core real time ultrasound physiotherapy can also be used in conjunction with physical assessments to assess tendinopathies. The most common tendons assessed on real time ultrasound include patella, achilles and gluteus medius tendons.
When a tendon is ill it can occasionally appear thickened on real time ultrasound. Hypoecoic (reflects relatively few ultrasound waves) areas are also visible which identifies that the tendon structure is altered. These areas show increased blood flow to the tendon on doppler imaging as shown below:
Real time ultrasound physiotherapy is an extremely useful treatment tool for a number of conditions and can assist patients in their rehabilitation. Patients often enjoy being able to see what is happening under their skin and can notice the improvements between sessions.
If you believe real time ultrasound physiotherapy could benefit you, or you wish to find out more about this treatment option, please contact our clinic by calling us on (02) 8323 7777 or email us at office@stadiumsportsphysio.com.au.
References
Bleakney, White and Maffulli (2007). The Achilles Tendon, Chapter 4- Imaging of the Achilles Tendon p25-38.
Kim, Cho, Goo and Baek (2013). Differences in Transverse Abdominis Muscle Function between Chronic Low Back Patients and Healthy Subjects at Maximum Expirations: Measurement with Real-time Ultrasonography. Journal of Physical Therapy Science. July 25(7): 861-863.
Peace, Lee and Healy (2006). Imaging the infrapatellar tendon in the elite athlete. Clinical Radiology 61, 570-578.
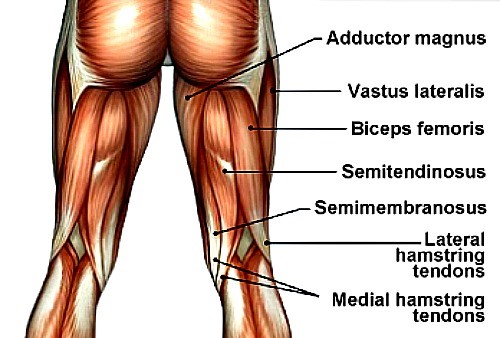
Have I Done My Hammy? - A Guide to Hamstring Strains

Hamstring strains are the most common muscle strain in athletes and are most evident in sports that require high running, speed and power demands. The hamstrings are very powerful and require a lot of eccentric contraction to slow the leg/control it when we run. Most patients report a sudden sharp pain when they tear a hamstring. Some are able to continue with the activity they are doing while others are not so lucky.
When do hamstring strains occur?
69% of hamstring injuries have a running related mechanism. The most common mechanism is during rapid acceleration but hamstring strains can also occur from a stretching manoeuvre e.g. forced over stretching with dancers.
Where do hamstring strains occur?
It is most likely to occur at the musculotendinous junction but tears can also occur within the tendon or muscle belly. The biceps femoris is most commonly injured hamstring muscle and accounts for 83% of hamstring injuries.
What are the risk factors?
- Previous history of hamstring strain
- Higher level of competition
- Fatigue
- Muscle imbalances
- Poor running biomechanics
- Decreased hip and/ or ankle mobility
- Poor neuromuscular control
- Poor pre-season training
- Increased training load
- Increasing age
- Ethnicity
- Previous ACL reconstruction
What are the different grades of hamstring strains?
It is proposed that there are three grades to classify the severity of a hamstring strain injury. These are:
Grade 1: Partial fibre disruption - No significant loss to strength and mobility
Grade 2: Increased fibre disruption - Some loss to strength and mobility
Grade 3: Complete rupture of tendon - Significant loss to strength and mobility
As a rough guide a grade 1 hamstring strain can take 3 weeks to heal, a grade 2 strain 4-6 weeks, and a grade 3 strain can take 6+ weeks. This will vary depending on factors such as age, previous history of hamstring strains, region of the tear, and correct rehabilitation.
Immediate treatment
Apply the RICE first aid method: Rest, Ice, Compress and Elevate, and make an appointment with a physiotherapist.
You should also avoid;
- Taking NSAID's in the first 3 days post injury as this affects the healing process and can increase your chance of re-injury
- Stretching can also increase your risk of re-injury
- Heat in the first 72 hours
What is the risk of future re-injury?
There is a 13-63% chance you will re-tear your hamstring again up to two years post injury. The greatest risk of re-tearing occurs in the first month after returning to sport. Due to this, it is important that you seek professional advice from a physiotherapist in regards to treatment and rehabilitation to ensure the best possible outcomes.
Other causes of hamstring pain
Pain in the hamstring region may be being caused by something other than a hamstring strain including;
- Referral from lumbar spine and/ or sacroiliac joint
- Local nerve irritation
- Piriformis muscle tightness
If you are experiencing pain it is always advisable to seek advice from a physiotherapist for correct diagnosis, treatment and for an individually tailored rehabilitation plan.
References
Brukner P, Nealon A, Morgan C, Burgess D, Dunn A (2013) British Journal of Sports Medicine.Published Online First: March 29, 2013.doi:10.1136/bjsports-2012-091400
Henderson G, Barnes C, Portas M. (2010). Factors associated with increased propensity for hamstring injury in English premier League soccer players. Journal of Science and Medicine in Sport 13. p397-402.
Freckleton G, Pizzari T (2012). Risk factors for hamstring muscle strain injury in sport: a systematic review and meta-analysis. British Journal of Sports Medicine- 2011-090664. Published online first: 4 July 2012.
Warren P, Gabbe B, Schneider-Kolsky M, Bennell K. (2008). Clinical predictors of time to return to competition and recurrence of following hamstring strain in elite Australian footballers. British Journal of Sports Medicine-10.1136/bjsm.2008.048181. Published online first: 14 August 2008.
Woods C, Hawkins R, Maltby S, Hulse M, Thomas A and Hodson A (2004). The footness association medical research programme: an audit of injuries in professional football- analysis of hamstring injuries. British Journal of Sports Medicine. 38(1):36-41.
Muscle Contusions
How do muscle contusions occur?
Muscle contusions, also known as “corkies”, are the result of a direct force to the muscle. In sport, this generally occurs from collision with an opposition player. However, muscle contusions can occur outside of a sporting environment e.g. after a fall or collision with an object such as a table. The most common site of muscle contusion is the front of the thigh and quadriceps muscle.

Why does it occur?
This mechanism of injury causes local damage to the muscle and bleeding to occur.
What are the signs and symptoms of a muscle contusion?
Signs and Symptoms will depend on the severity of the contusion. These may include:
- Feeling weak and/or stiff
- Bruising
- Difficulty walking and/or running (lower limb contusions)
- Reduced range of motion
- Localised pain/discomfort
- Localised swelling
What should I do immediately after sustaining an injury?
You want to decrease blood flow to the area so it is best to use the RICE method:
Rest
Ice (with muscle in lengthened position)
Compression
Elevation (where possible)
It is advised to avoid heat, alcohol and massage for 72 hours as this will promote blood flow to the area during the acute phase and make your symptoms worse. The use of anti-inflammatory medications in the first 72 hours is also not advised as this can affect your recovery.
What would physiotherapy treatment involve after the first 72 hours?
Treatment will focus on range of motion and strength exercises to assist you in returning to your regular daily activities and/or sport. Your physiotherapist may also suggest appropriate protective equipment to assist with this process.
Prognosis
Depending on the severity of the contusion, most players are able to continue their sport. However, prognosis can range from 0-6 weeks. If the muscle contusion does not resolve in this time frame, a patient must be assessed for myositis ossificans. This condition involves calcification in the muscle and can delay your recovery.
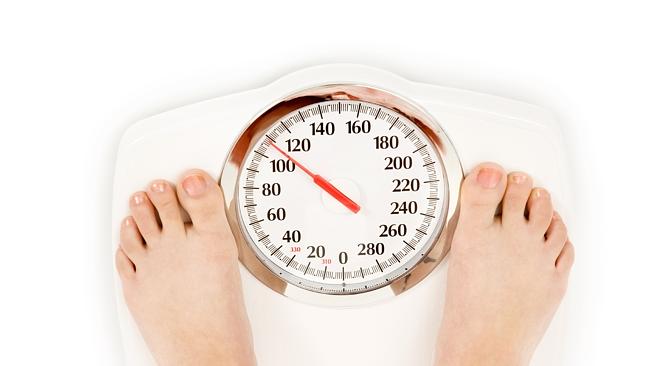
How to Ward Off The Winter Weight!
Research shows that there is a correlation between increased weight and lower limb injuries including knee deterioration and arthritis. Most people, on average, gain 5kg each winter so we asked Sports Dietician, Peta Carige, how our clients can keep the winter weight and extra kilos at bay this winter.....
It is our bodies natural inbuilt survival mechanism to put on a protective layer of fat come winter, but due to the availability of internal heating, warm jumpers and blankets it is no longer essential. So how do you prevent those unwanted winter kilos?
Firstly, stick to your summer routine of exercise. Don't be lulled into extended periods in bed because it is cold because as soon as you break your training routine it becomes harder to say ‘no’ to the comfort foods on offer.
Cook healthy comfort foods for dinner such as healthy soups, casseroles, baked spuds with spicy chilli con carne or my personal favourite low fat beef stroganoff. All of these meals are heart warmers, but they can easily be made low fat and be bulked up by extra vegetables.
The sugar cravings hit a little harder during the winter months so be prepared with the following; low energy hot chocolates or good quality hot chocolate powder such as raw organic cacao or Jarrah Choc'o'lite sachets. These will often be enough to cure the sweet cravings for less than 300 kilojoules. Another great winter trick is to utilise all of the different flavoured teas out there, if you have a cup of tea before you look for the chocolate, I promise you will eat less of the chocolate or resist it all together. Another great filling dessert is the chia seed puddings - super easy to make and they cure the sweet cravings after dinner while helping with satiety.
Lastly, it may seem simple, but ensure that you rug up and stay warm. When your body is cold, it will literally tell your brain to eat to a) warm up due to the energy/heat produced from metabolising and b) to add more fat for warmth. An extra jumper easily solves this problem.
So in summary, don't change your alarm, cook healthy comfort foods, be prepared with low energy desserts on hand, wear an extra jumper and come out of winter ahead not behind!
Triple Berry Chia Pudding
Ingredients
- 1 cup unsweetened almond or coconut milk
- 3/4 fresh bluberries, blackberries and raspberries combined
- 2 tbsp or 1/4 chia seeds
- 5-6 drops Nu-Naturals liquid stevia (or honey) to taste
Method
- Combine the milk together with chia and fruit in a glass jar with a lid. Cover and shake well, set aside for 15 minutes.
- Give it another shake after 15 minutes then refrigerate overnight or for at least 5-6 hours.
- Enjoy
TIP: easy recipe to alter the flavour with, add 3tbsp raw cacao or cocoa powder and mix with your favourite berries to make a chocolate pudding
For more nutritional advice head to Peta's website, Functional Food Solutions , or contact the The Stadium Sports Medicine Clinic on (02) 8323 6500 to book an appointment.
Hip Impingement
What is Hip Impingement?
Hip Impingement or Femoral Acetabular Impingement (FAI) is a condition of the hip where additional bone is present on joint surfaces. This additional bone is known as a CAM or pincer lesion and can cause joint impingement with certain movements, such as deep squatting. Around 20% of the population have FAI but only 23% of these people complain of hip pain.
Hip Anatomy
[one_half]
Hip Anatomy

- Source: http://www.arthroscopichipsurgeon.com/hip-arthroscopy.html
[/one_half]
[one_half_last]
Pincer and Cam Lesions
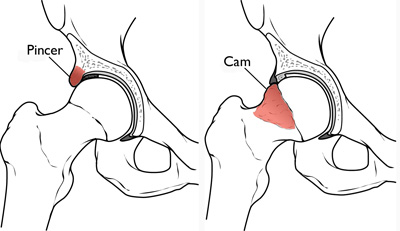
- Source: http://orthoinfo.aaos.org/topic.cfm?topic=A00571
[/one_half_last]
Risk Factors
Current or past high level athletes, especially athletes or play high intensity sports that require repeated hip flexion and twisting movements e.g. AFL, netball, and cycling, are at greater risk of hip impingement. Other factors that may increase your risk include;
- An active lifestyle especially throughout childhood and adolescence
- Muscle imbalances
- Poor biomechanics
- Instability
- History of knee surgery
- Obesity
- Genetics
- Gender - males are more at risk than females
Signs & Symptoms
- Dull ache over front of the hip and/or groin - this pain may also be sharp at times
- Pain with deep squats, sitting cross-legged, running, twisting, walking upstairs, prolonged sitting (especially in a low chair)
- Hip stiffness
- Muscle deconditioning for moderate to severe cases
- Altered walking and running biomechanis for moderate to severe cases
It is possible to still have FAI if you do not have all of the symptoms listed.
Prevention
The risk of developing FAI can be reduced and/or prevented by;
- Monitoring exercise intensity and frequency (especially during childhood and adolescence)
- Cross training
- Assessment and treatment from a physiotherapist to address areas of weakness, tightness and instability
- Correct rehabilitation of previous injuries
- Pre-season screening
Immediate Management
Rest, ice, avoid high intensity exercise and movements requiring repeated hip flexion, twisting and deep squatting to relieve symptoms of hip impingement. Seek professional opinion from a physiotherapist for a correct diagnosis and an individually tailored rehabilitation program.
Rehabilitation
This will vary depending on the severity of your symptoms and the duration of your condition. Physiotherapy will assist with symptom relief and will provide strategies to address any factors that may be limiting your recovery.
It is important to remember that this condition is an anatomical matter but symptoms can usually be managed well through conservative treatment. However, if you do not is not respond well to this approach after 4-6 weeks, you may require a corticosteroid injection or surgery.
For more information on femoral acetabular impingement (FAI) head to the website of Dr Matt Lyons, orthopeadic surgeon specialising in hip and knee surgery. Follow the link below for a video which explains the condition in more detail and provides information about the surgical intervention of FAI:
http://www.drmattlyons.com.au/patient-info/conditions-procedures/hip/
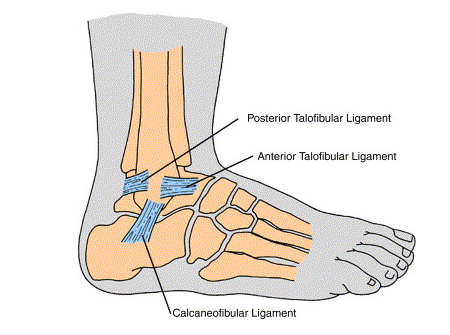
Ankle Sprains
What is an ankle sprain?
Ankle sprains are one of the most common sporting injuries. A sprain can be defined as the tearing of one or more ligaments in the ankle. Most ankle sprains are likely to affect the lateral ligaments (around 80% of sprains) of which the anterior talofibular ligament (ATFL) is most common.
Following a sprain the ankle joint may become unstable and will take some time to recover. It is important to manage and rehabilitate the injury correctly in order to prevent further injury.
Ankle Anatomy
Risk Factors for Ankle Sprains
You may be more at risk of an ankle sprain if you have:
- poor proprioception and balance
- weak stabilising muscles
- reduced range of motion
- a previous history of ankle sprains
Other risk factors include the playing surface condition, shoe type and the type of sports and activities undertaken. Ankle sprains are more likely to occur during sports which require jumping, turning, twisting and fast changes of direction. They can also occur in a non-sporting environment from rolling the foot when walking on an uneven surface or slipping on a floor.
Signs & Symptoms
Ankle sprains are diagnosed from Grade 1 to 3 depending on the severity. An x-ray can rule out a fracture and an ultrasound or MRI can be performed to determine the severity of ligament damage.
Grade One (Mild):
Swelling around the ankle and pain
Grade Two (Moderate):
Golf ball swelling with or without bruising, pain and increased pain when weight-bearing, and restricted movement of the ankle.
Grade Three (Severe):
Golf ball swelling, bruising, pain, inability to place weight through your foot and restricted movement of the ankle and foot.
Prevention of Ankle Sprains
Balance exercises and strengthening of stabilising muscles around the ankle will help prevent ankle sprains. Stretching will also maintain ligament flexibility and joint mobility to help reduce the risk. If you have a history of ankle sprains taping the ankle can help provide some stability whilst performing activities and sports that put you more at risk.
Immediate Management and First Aid
Ice will be helpful in the first 72 hours after injury to reduce the amount of swelling and for pain relief.
Elevation and compression are also helpful for swelling management which will in turn prevent joint restriction.
Avoiding heat, alcohol and excessive weight bearing in the initial 72 hours after injury will also prevent excessive swelling and joint irritation.
It is also important to seek advice from a physiotherapist on the grade of the injury as there can be multiple ligaments that have been sprained and also it is possible that there could be a fracture or a muscle strain.
Rehabilitation of Ankle Sprains
The length of time sprains take to heal varies greatly on the grade of sprain, whether multiple ligaments are involved and the amount of swelling. If it is a low grade sprain it can take 2-4 weeks before being able to return to sport however, this can increase to 6-8 weeks if it is a high grade sprain.
A physio will be able to determine the most appropriate rehabilitation programme based on the level of sprain and other associated signs and symptoms. This programme will usually involve strengthening exercises, balance, mobilisations to improve range of movement and/or taping techniques. Taping can be beneficial in the first weeks after a sprain to prevent a repeat injury particularly when returning to sport.
Compression Stockings and Running
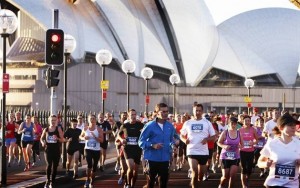
- Source: http://www.smhhalfmarathon.com.au/
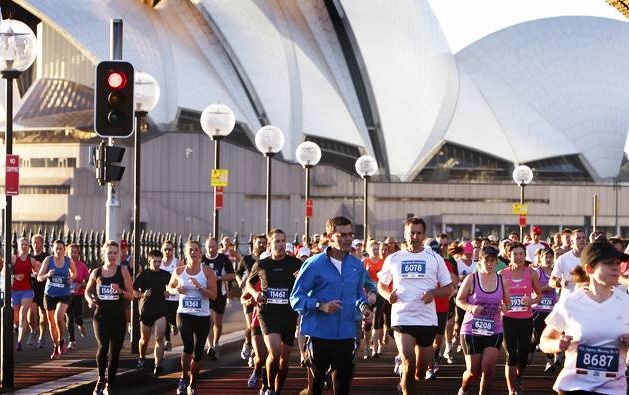
With the SMH Half Marathon approaching, many may wonder if the use of compression stockings during the event actually make a difference to performance and muscle damage.
In a soon to be published article in The Journal of Orthopaedic and Sports Physical Therapy by Areces et al… from Spain, looked at compression garments and marathon running.
The purpose of the study was to look at compression garments effect on exercise-induced muscle damage. They took 34 participants from the Madrid Marathon and split them into two groups. One wore compression stocking which went up to their knees and the other group wore regular running socks.
At the end of the event they looked at various markers like blood and serum responses, leg volume and fluid movement, race time and pace and perceived muscle fatigue and pain. Unfortunately the study found that wearing compression stockings during a marathon race did not improve race time, perceived exertions or post-race concentrations of blood markers of muscle damage.
Figure below shows running pace of those wearing compression stockings in comparison to conventional stockings;
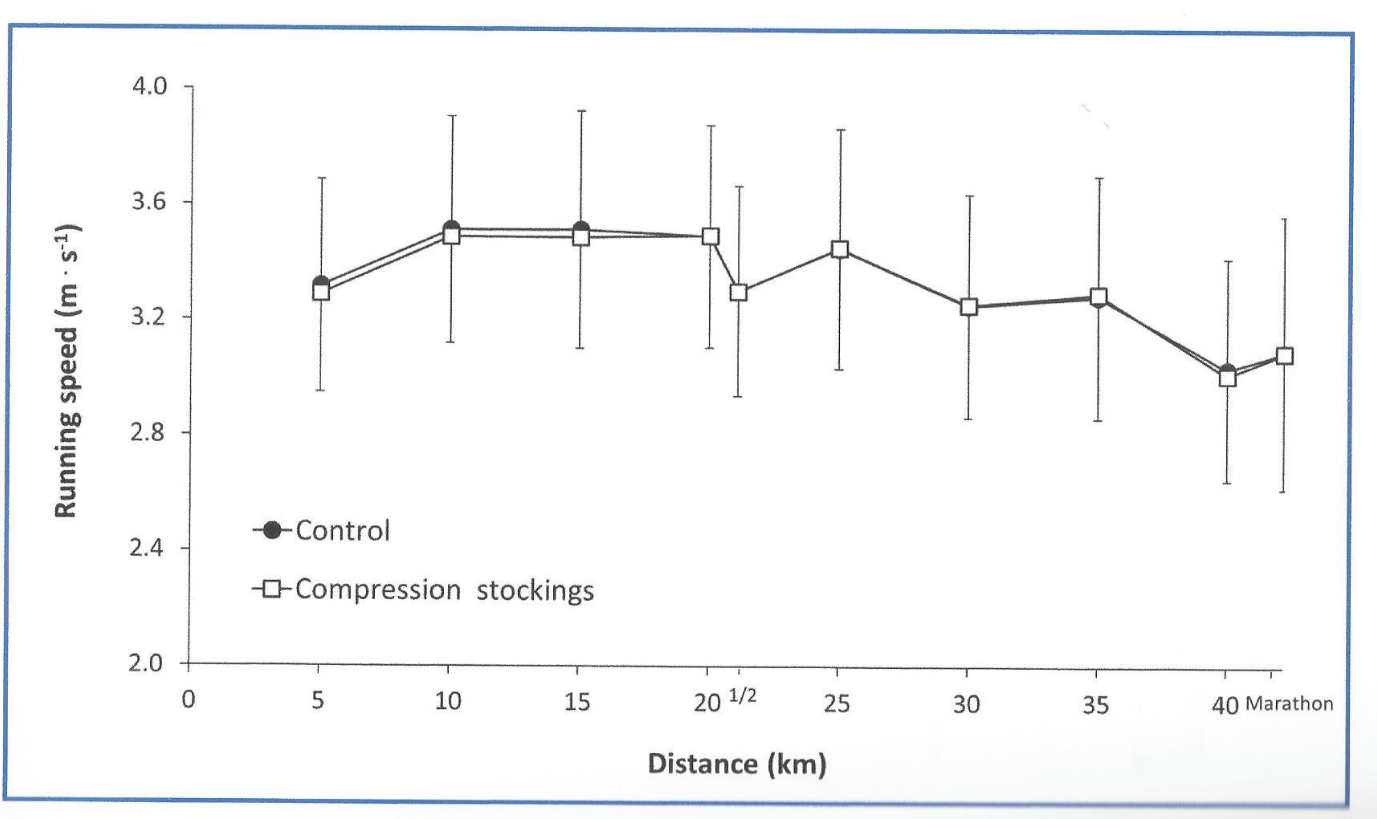
But do not throw your stockings out just yet!
In previous research, a meta-analysis published last year in the British Journal of Sports Medicine, found that compression garments do provide a moderate effect in muscle recovery following exercise (delayed onset muscle soreness, muscle strength and power).
Dynamic Stretching Exercises for Injury Prevention
In previous posts we have discussed the benefits of dynamic stretching in order to help prevent injury. Dynamic stretching exercises are best performed as part of your warm up routine and involve using movement or momentum to move a muscle between its extremes of range.
Justin Merlino, Sports & Musculoskeletal Physiotherapist here at Stadium Sports Physio, has put together the following list of exercises that can be incorporated into any warm up routine. When completing these exercises remember that movements should be controlled and should not be vigorous or bouncy at the end of range.
#1 Walking Lunges
- Begin with feet shoulder width apart, then step forward with one leg, flexing the knees to drop your hips.
- Descend until your rear knee nearly touches the ground. Drive through the heel of your lead foot and extend both knees to raise yourself back up.
- Step forward with your rear foot, repeating the lunge on the opposite leg.
#2 Walking Calf Raises
- Begin with feet shoulder width apart, then step forward with one leg, landing on the heel of your foot and then rising up onto your toes.
- Lower yourself down in a controlled way and then repeat on the opposite leg.
#3 Crab Walking
- Begin in a semi squat position with your feet hip width apart and hands on hips.
- Slowly step sideways, maintaining the squat position and ensuring your pelvis and shoulders stay level.
- Repeat for 10 meters in both directions.
#4 Spiderman
- Begin in a prone position on the floor, supporting your weight with your hands and feet. Your arms should be bent to 90 degrees.
- Initiate the movement by raising one foot off the ground and externally rotating the leg, while bringing it as close to the elbow as possible.
- Place the foot on the ground near your hand, then push off your foot and step forwards with the opposite foot, repeating the same motion of the leg towards the elbow
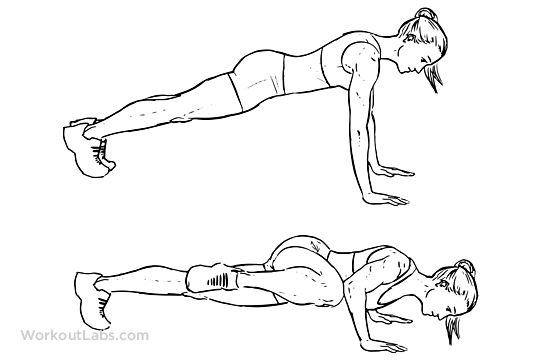
#5 Inchworm
- Begin in a push-up position on the ground.
- Slowly step your feet in towards your hands, keeping your knees straight.
- Step as far as you can that’s comfortable for your back and hamstrings, then slowly walk your hands forward to the starting position.
#6 Glute Bridge
- Begin lying on your back with your knees bent up and feet flat on the floor.
- Push through your heels and slowly lift your hips off the ground until they are in line with your knees and shoulders.
- Slowly lower yourself back to the starting position.
- This can also be performed on one leg with the other leg held in the air.
#7 Aeroplanes
- Begin sta
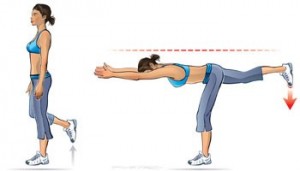 nding on one leg with your arms out to the side or in front of you.
 - Slowly tip forwards from your hips, keeping your back flat and with a very slight bend in your stance knee.
- Tip forwards until your trunk is nearly parallel with the ground, making sure you don’t twist with you pelvis.
- Squeeze your buttock and then slowly extend back up to the starting position.

[one_half]
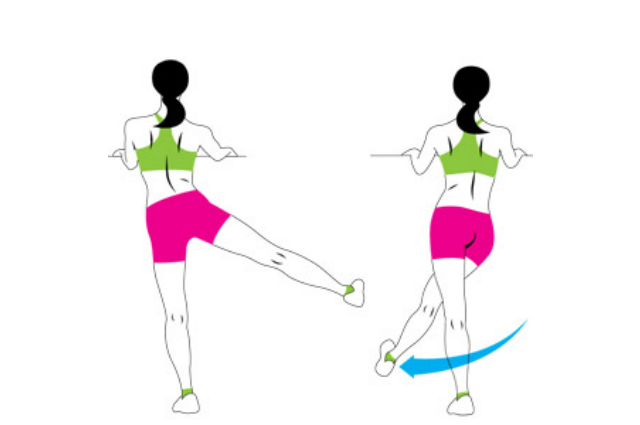
#8 Forward/ Backward Leg Swings
- Begin standing tall and holding onto a sturdy object
- Brace your core then gently swing one leg forwards as far as you comfortably can and then allow it to swing backwards just past the midline of your body.
- Repeat on the opposite leg

[/one_half]
[one_half_last]
#9 Side Leg Swings
- Begin facing and holding onto a sturdy object.
- Swing one leg out to the side as far as you comfortably can, then swing it back across your body as far as you comfortably can.
- Repeat on the opposite leg

[/one_half_last]
[one_half]
#10 High Knee Running
- Begin by slowly jogging forwards, then increase the height of your knee lift with each step until your thighs are just above parallel to the ground.
- Maintain an upright trunk position and try to land on the balls of your feet with each step.
- Make sure to drive the opposite arm forwards to the knee that is moving up in the air.
[/one_half]
[one_half_last]
#11 Butt Kicks
- Begin by slowly jogging forwards, the try to kick your heel up towards your bittock with each step.
- Maintain an upright trunk position and try to land on the balls of your feet with each step.
- Make sure to drive the opposite arm forwards to the knee that is moving up in the air.
[/one_half_last]
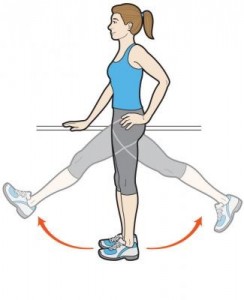
#12 Grapevines
- Perform a criss-cross with your legs by stepping side-to-side.
- Make sure to keep your trunk and pelvis perpendicular to the direction you are running.
- Repeat in both directions.